10 Daiso Craft Materials

The US and the UK has their Dollar Stores, while Asia has its $2 version with its Daiso Stores.

Most Singaporeans love all things Japanese, from food (I am Japanese food fan myself!) to their culture. So naturally, products that are branded in Japan (although many are made in China) will be largely popular with Singaporeans.

I think the Japanese are ingenious with their ideas for craft, so to find a store where craft materials are found easily and cheaply is a thrill for any crafter.

Here’s sharing 10 of my Daiso buys for craft:

1. Felt Craft Daiso 8

I have used the felt from Daiso for some of my felt craft projects. As Daiso felt is made of polyester, it is washable and good for making of felt ornaments. But not recommended for the making of toys, softies and craft projects, that one intents to keep or requires more handling.

Daisy felt is best used for children’s craft, hair ties or clips. hanging mobiles, ornaments, brooches or small felt mascots.

Here are some Felt Craft tutorials, where Daiso Felt can be used;

Felt Projects(L to R) Craft Tutorials can be found in link; Felt Air Balloon Mobile, Felt Birds and Leaves Hanging Ornaments

2. Origami Paper

Craft Daiso 3

I use Daiso Origami paper for making Kirigami and occasionally Origami creations like these;

Craft Daiso 21

Kirigami and Origami can be used for gift wrapping and many other decorative purposes (Washi tape, wooden pegs and Kraft Paper Bag pictured below are all from Daiso).

Craft Daiso 20(L to R) Craft Tutorials can be found in link; Bear Kirigami and Ribbon Origami, Rabbit Kirigami Gift Card and Washi-fied Gift bag and Wooden peg

4. Cutting Mat and Precision Knife

Craft Daiso 27

They are a must-have when making Kirigami or cutting paper.

4. Construction Paper Craft Daiso 2

I have just discovered these coloured papers in Daiso a couple of months ago. I found the texture of the paper and range of colours available adequate for paper-flowers making. These papers are also sold in A4 size in a single colour in a pack.

Craft Daiso 11

Daiso coloured paper are good for card creations like these;

Craft Daiso 29Top to Bottom Craft Tutorials at link; Nothing Like a Mother’s Love Card, Papa Bear Father’s Card

5. Colour boards in Styrofoam or Cork Material Craft Daiso 5

I get them in white to mount the boy’s and my paintings to create a faux canvas base, and skip the picture frames, so that they can be easily pasted on the walls with blu-tack or mounting strips.

No one should put original ‘art’ in frames, unless they are reproduction prints bought from IKEA 😛

Cork can also be used in many DIY Homeware or Decor ideas. Just add your own designs with markers or paint.

6. Wooden Blocks in various sizes or Wooden Sticks and Sandpaper Craft Daiso 7

The wooden blocks are available in small square, rectangular shapes etc. These blocks that can be drawn, painted on, or pasted together to form a letter holder like this, with glued-on Hama Beads;

Screen Shot 2015 10 03 at 12 42 27 pm

While Sandpaper is a must have to prep the wood before it is ready to be painted on.

7. Pill Cases Craft Daiso 15

Extremely useful to segregrate Hama Beads into specific shades.

What is Hama Beads Crafting? Read more about it in this post. While the tweezer in pictured below is also from Daiso.

Craft Daiso 17

8. Shrinky Plastic and Tracing Paper Craft Daiso 4

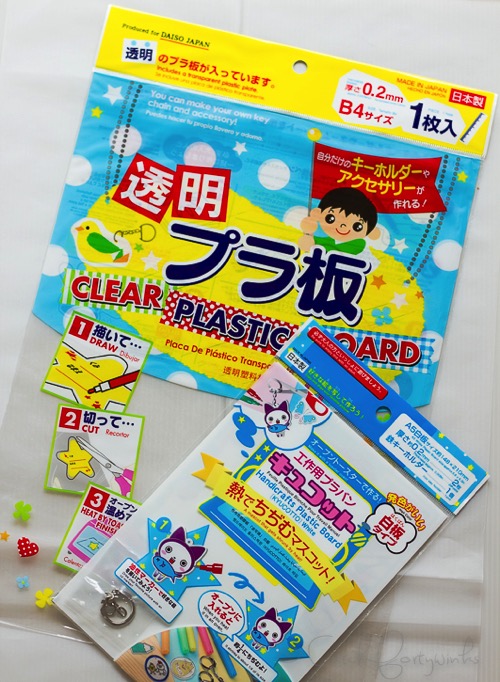
There are at least 3 different types of Shrinky Plastic that are sold in Daiso. Pictured below are the clear and the opaque ones. There are the Neon ones available in some of the Daiso stores.

I have tried the opaque ones that come with a keyring in the pack and found them to be good enough for making keychains and fridge magnets.
Craft Daiso 6

9. Magnetic Tape

Craft Daiso 23

Useful for making your own magnets from Shrinky Plastic, or magnetic wooden pegs.

10. Wooden Pegs

Craft Daiso 26

Apart from its basic use for hanging laundry on a drying rack, wooden pegs have numerous uses in craft. Just stick on washi tape :)

I have been using the small wooden pegs for winding my embroidery thread (like a thread spool), while the small scissors and sewing pins pictured below are also from Daiso.

Craft Daiso 16

I spend more time in the craft aisle in Daiso than all the other aisles combined, as I am always looking for the next item that I can use to craft something new.

However…

There are a few things that I have bought from the craft aisle that I would not buy again, namely, play dough, soft clay, embroidery floss (thread), paint and brushes. Since it is $2, can expect that these things are not of very good quality.

The play dough and soft clay is really hard to manage without making a huge mess. Even after lining the table / floor with newspapers, the stray bits of dough or clay tends to stick on the floors and tables. Only recommended for moms who have no issues spending some extra time to clean up after their child after play.

While DMC is always my choice for embroidery floss, even when sewing on Daiso Felt. The quality of thread does make a difference to the one who is sewing and to the final product.

As for the Daiso paint and brushes, they are apt for children doing exploratory art, but not when the child or adult is starting to get more serious about taking up painting as a hobby. The paint pigments tend to be inconsistent and brushes often split at the ends after the first few washes.

For better quality art and craft supplies, and if you are willing to spend more than $2 per item, try Artfriend and Spotlight.

So what are the craft materials that you have used from Daiso?


For more on Daiso 101, 


Next on the 101 Daiso Blog train will be Winnie of ToddlyMummy.

Winnie Toddly Mummy

At her blog,  http://toddlymummy.blogspot.com Winnie shares her thoughts on parenting, fun learning moments of home learning sessions and outdoor adventures. She reviews books and other kids’ stuff. She sometimes shares about her favourite food too, along with the occasional side orders of stuff that she finds useful as a busy mum.


Share it:

Related posts:

Decorating a Plain Paper Bag with Kirigami Rabbits

Kirigami giftwrap 16

This paper bag is as plain as it gets, no frills at all, and it costs only $2 for 3 from Daiso.

So what do you do with plain paper bags? Use Washi!

One word of caution in using Washi Tape, please don’t paste many different patterns together, like there is no end to the tape. Personally I think it’s nice to use 3-4 different designs, as long as the colours are complementary to one another.

When pasting Washi on stuff, think patterns, think lines, and shapes. Nice decorated MT tapes are wasted when they are pasted on stuff haphazardly. You might have a huge stash, but do try to restrain yourself when it comes to decorating stuff with Washi, as it might just end up looking like your 3 year old kid did the crafting.

What you will need for this project :

1. 1 Kraft Paper Bag

2. Wooden Clothes-peg

3. Washi Tape

4. Penknife

5. Scissors

Kirigami giftwrap 25

  • Paste Washi Tape on Kraft Paper Bag. I kept it simple, as will be adding on a Kirigami feature on the right of the bag to balance it out visually.

Kirigami giftwrap 26

  • More use for the Washi Tape! Paste tape on the wooden clothes peg, trim away the excess
  • Making the Kirigami Rabbits
Kirigami giftwrap 17

You will need :

1. Origami Paper – In a matching shade to the Washi Tape

2. Sharp Scissors

3. Pen-knife

4. Xacto Knife

5. Self-Healing Mat

6. Kirigami Bear (4-fold) and Rabbit (8-fold) patterns Rabbitkirigami numbered

1) Fold the 15cm x 15cm Origami Paper in Half

2) Fold it into quarters

3) Fold it into 1/8 – this is known as the Kirigami Rectangle 8-Fold

4) Make sure that the triple V’s of the folds are facing to the left side

  • Cutting out the Kirigami Rabbits

Rabbitkirigami1 numbered

1) Staple the pattern of the rabbit on the base of the Rectangle 8-Fold paper, making sure that the edges are lined up

2) Cut out the pattern, you will have to use the Xacto Knife for the fine corners of the pattern.

3) Open up the paper, you should see 3 pairs of rabbits holding hearts, and 2 rabbits holding on to halve heart shapes.

  • On plain drawing paper, draw a circle using a drawing compass.

Kirigami giftwrap 27

  • Paste the Kirigami Rabbit cut-out on the circled card, trim off the excess paper cut-out

Kirigami giftwrap 28

  • Clip the card on to the right side of the bag, with the wooden clothes-peg.
There you have it, a decorated Kraft Paper Bag with Washi and Kirigami Rabbits card. This design is versatile for a gift bag for a 1-month old baby present, or can be used to hold a gift for a lady.

Kirigami giftwrap 15

P.S. In case you are wondering if I am using Rabbits, as it is Easter this weekend. For sure,  you can use the Kirigami Rabbits design for your Easter bags. I used this bag to hold a gift for a friend, didn’t need any specific occasion.

This post was not planned to coincide with Easter this week, you can read what I think about ‘Rabbits and Eggs’ that are commonly used as celebrated visuals for Easter.

Share it:

Related posts:

Bow Origami and Bear Kirigami for Gift Wrapping

After the last experience I had with gift-wrapping during Christmas last year, I have since given up on patterned papers for gift wrapping.

I didn’t do such a bad job with it, but I felt the prints were kind of busy and it was not that worth spending money on since gift wrap paper was not exactly that cheap from Typo. The prints were lovely and festive, but they were ‘time-sensitive’, as I am not able to use the remaining Christmas gift-wrap paper until Christmas comes around this year.

Screen Shot 2015 03 11 at 3 22 34 pm

I like to work with cheap and easily accessible materials for crafting. And the best place for cheap but useful materials to be used in crafting? It’s Daiso, of course (this is not a sponsored post btw, just sharing my fondness for cheap craft materials from Daiso).

The thing with Daiso I realised, is that you need to have a rough idea of what you plan to craft and be very specific with the kind of materials that can be used for your project, if not, you will end up cluttering your home with lots of cheap but don’t-know-what-to-do-with-them materials.

As I am into Origami and Kirigami lately, I have been buying Origami Paper. And from my last trip to Daiso, I couldn’t resist getting 2 of the $2 Washi Tapes that were sold there.

Since we are into the topic of Washi Tape, let me show off my collection.

Screen Shot 2015 03 11 at 3 38 27 pm

Yup. It’s just 10 rolls of multicoloured washi and the two new rolls that I got from Daiso. You were expecting a whole stash, isn’t it? Well, I did say that I was a cheap crafter, I only buy what I know I will use. I have been using the multi-coloured tapes so much for my #InHisLoveMail snail mail packages, that I might have to get a replacement set quite soon.

I think Washi is one of the most ‘dangerous’ craft materials that are out there, especially the MT branded ones. It is easy to become a MT Washi Collector, but a little more challenging to be a frequent Washi user and knowing how to use them tastefully for crafting projects. Enough from me, griping about the dangers of Washi…

So without further ado, here’s sharing a gift wrapping idea combining Origami, Kirigami, Kraft Paper and Washi Tape.

Kirigami giftwrap 14

What you will need;

1. Origami Paper (3 sheets, colour of your choice)

2. Kraft Paper

3. Washi Tape

4. Scissors

5. Sticky Tape

6. Kirigami Bear Pattern (available together with the pattern in the next post)

*You don’t need a self-healing mat for this, as the Kirigami Bear Pattern can be easily cut out using a sharp pair of scissors


  • Making the Origami Bow

Origamibowwithnumber

1) Select to compliment colours for the ribbon, I chose grey and pink
2) Have the white sides of the origami paper facing one another
3) Glue the back of the origami sheets together
4) You will then get a single sheet of origami, front is coloured grey, and the back is pink.


The instructions to make the origami bow is found in a YouTube video here:

Kirigamibow1

5) I used a gold pen to draw dots on the origami bow to make it a gold polka-dotted bow, you can keep it plain if you prefer.


  • Making the Kirigami Bear

Kirigamibearnumbered

1) Fold the 15cm x 15cm Origami paper in half

2) Fold it into quarters – this is known as the Kirigami Rectangle 4-Fold

3) Make sure that the double v’s of the folds are facing the left side

4) Staple the bear pattern at the barn of the 4-fold rectangle, making sure that the edges are lined up with one other.

5) Cut out the pattern, and unfold the paper. You should see 2 pairs of bears joined together.

Kirigami giftwrap 5

  • Wrap the box or present with Kraft Paper
  • Paste the Washi Tape vertically across, indented to the left of the box
  • Intersect the Washi Tape horizontally across, indented to the 3/4 top part of the box

Kirigami giftwrap 12

  • Paste the Origami Bow on the intersection where the Washi Tape crosses one another
  • And paste the Kirigami Bear diagonally below


And there you have it, a gift wrapping design with a Bow Origami and Bear Kirigami! This gift wrapping design can be for a guy (my dad’s birthday is coming up in April) as you can skip the drawing the polka dots on bow, and the bears make it less feminine. But it is adaptable for a gift for a child or a lady too.

Kirigami giftwrap 13

**Note : The Kirigami Bear pattern will be available together with the pattern for the next post

Share it:

Related posts: